As an Amazon Associate, this site earns commissions from qualifying purchases. For more details, click here.
The benefits of solar power for RVs is evident by now, but how easy is the system to set up? Portable solar panel installation for RV can be done by professionals sure, but you can do it yourself and save hundreds of dollars. The process isn’t that hard if you follow this step by step guide and follow your solar kit’s instructions.
There are four steps to setting up an RV solar power system. Solar power configurations vary, but the basics are the same.
- Mount the solar panels
- Run the wiring in the RV
- Connect the charge controller
- Hook up the inverter
Sounds easy enough doesn’t it? Well there are a few more things you have to do of course, but that’s basically it. Your solar panel comes with instructions but the following is a general guide you can use as well.
Solar Power Installation Safety Tips
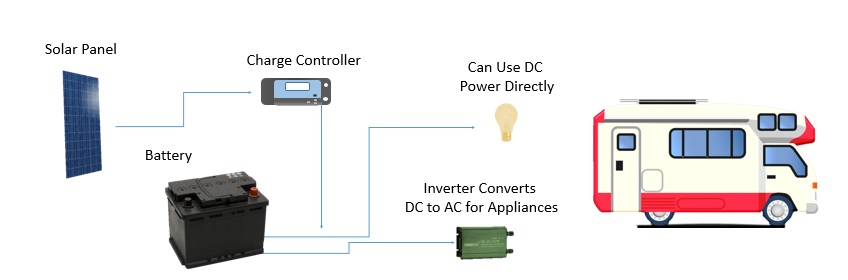
Here is a diagram that shows how the parts are connected. This is for a single solar panel system, but you can add more solar panels to your system and the connections will still be like the one below. The only difference is you have additional solar panels.
Before moving on to the actual installation, you have to do some safety checks. Solar power installation is easy, but it never hurts to be careful and perform a through check of all components.
- Read the instructions before you start
- Prepare all required tools and materials before starting
- Wait for clear, sunny weather to do installation
- Do not drop or hit the panels, charge controller or inverter
- Put cloth around the panels to prevent charging during setup
- Do not touch the terminals or other live electric circuits
Inspect the Solar Panels
You should check the solar panel before installing it. No need for fancy equipment here, you just need to carefully look over the panels for cracks, smears, dents etc. Return the panel and ask for a refund if there are any signs of damage.
If the visuals are okay, perform an electrical check. Do the following on every solar panel you will install. Basically the multimeter readings should be the same as the manufacturer’s given panel ratings. You can find the rating at the back of the panel, the shipping box or in the instruction manual. Look for the Short Circuit Current (lsc) and Open Circuit Voltage (voc).
How to Check Solar Panel Voltage
- Get a multimeter and set it to DC voltage mode.
- Insert the meter lead in the panel wires. Connect the black lead to the negative wire and the red lead to the positive wire.
- Read the voltage reading. It should be the same as the voc indicated. Values are usually 13V to 20V depending on the amount of sunlight getting to it.
How to Check Solar Panel Current
- Set your multimeter to DC current mode. There are plenty of options but we like the Klein Tools Digital Multimeter as it is easy to use.
- Connect the leads to the terminals the same way you did during the voltage check.
- Look at the short circuit current display (ls). The value has to be the same as what is stated by the manufacturer.
If the voltage and current checks are okay, you can be certain the solar panels are in good condition and you can proceed with the installation.
Solar Circuit Wiring: Series vs. Parallel Configuration
Before installing the solar panel, decide if you want to do a series or parallel configuration. They both have pros and cons and both have their followers. The following information should help you decide what set up to use.
Wiring Solar Panels in Series
Shorter and lower gauge wire are needed for series wiring solar panels. In a series, each panel’s output goes into the next as they are linked end to end. The lower current lets you use lower gauge wire, but the voltage is higher.
Lower gauge wire is cheaper so series wiring solar panel is less expensive. It’s also lighter as you need less wiring. However you need to use an MPPT charge controller because of the higher voltage. The MPPT turns the high voltage into current suitable for solar batteries.
The main disadvantage of series wiring is it restricts the current to the panel’s lowest output. This is why you need a bypass diode to keep a shaded panel from affecting the others.
Pros
- More affordable than parallel wiring
- Easy to set up
Cons
- A shaded panel will lower the entire array’s output
- Requires a diode bypass and MPPT controller
Wiring Solar Panels in Parallel
Parallel wiring keeps the voltage even in the entire array. The current is also higher compared to series wiring. In case a panel is shaded it will not affect the other cells’ production. Unlike in a series, parallel wiring links the positive and negative head separately. In a series the panels are always strung together.
The disadvantage of parallel configurations is you need heavier gauge and longer wiring. It is not only more expensive but the process is more complex.
Pros
- A shaded panel has little to no effect on the array
- More efficient than series wiring
Cons
- More expensive due to heavier gauge wire requirement
- Setup is more complex than series wiring
PWM vs. MPPT Solar Charge Controllers
By calculating how much power you need, it’s easy to figure out what types solar panel and batteries are required. But what about the solar or battery charge controller? In an off grid setup, the charge controller absorbs the solar energy provided by the panels. It also charges the battery and ensures the battery is well maintained.
Because of its important functions you have to choose the right charge controller. There are two types commonly used: PWM (Pulse Width Modulated) and MPPT (Maximum Power Point Tracking). Here are some points to consider when deciding.
Batteries used in RVs are in the 12.5 to 13.5V range but require 14.5v charge to get to that point. Solar panels produce 18V to 20V under peak sunlight, so you need a charge controller that makes full use of the power.
A PWM controller can only use a maximum of 14.5v to charge the batteries. The rest of the energy provided by the solar panel is thrown away, which is a waste. A PWM controller is not practical for high voltage solar panels, which is what most RVs use.
An MPPT controller costs more than a PWM but is more efficient. The 14.5v drawn from solar panels is used to charge batteries, and the excess solar energy reduces charge time. It is not as wasteful as a PWM so it’s more suited for RVs. We recommend the BogueRV 40A MPPT Charge Controller as it works with all RVs and deep cycle batteries.
If your RV has a single solar panel, a PWM may suffice. For two or more solar panels, it’s better to invest in an MPPT controller.
How to Install Solar Panels on an RV Step by Step
The following is a general overview of the installation process. The specific steps may vary depending on solar panel type, vehicle specs, etc. Check the instructions that came with your kit before proceeding.
Required Tools and Materials
Your solar kit should come with all the essential equipment. Refer to the instructions for particular tools you will need. A typical solar power installation requires:
- Solar panels
- Inverter
- Solar charge controller
- Battery
- Connectors and wires
- Adhesive
- Solar panel mounting hardware
- Screws, nuts and bolts
- Screwdrivers
- Drill
- Safety gear (goggles, gloves, safety harness)
Step 1: Mount the Solar Panels on the RV Roof
For rigid solar panels: fasten to the roof with screws. Use the mounting hardware that came with your solar kit.
For flexible solar panels: adhesive is often used to secure these into place. The roof type determines what adhesive must be used, so you have to buy it separately from the solar kit.
Position the panels as desired. Avoid the vent, air conditioning system or other locations that might obstruct the panel. Mark the locations and secure the panels.
Use the provided mounting hardware to bolt the panels. If bracketing, apply sealant on every bracket to ensure it is water tight. Refer to your RV manual for the best sealant to use. Screw in the solar panels.
You can install as many solar panels as you need provided there is space on the roof. The roof’s front area is the ideal location as it has plenty of room. Placing the solar panels together also makes it easier to make adjustments. Regardless where you install the panels on the roof, applying weatherproof seal is essential. Double check the screws to ensure they’re tight.
Series and Parallel Wiring Guidelines
Solar panels can be wired in a parallel or as a series as described earlier. The required MC4 connectors should be included in the kit. MC4 connectors are secure and waterproof so the panels won’t suddenly come off. They are also weather resistant.
Wiring solar panels in a series requires plugging a connector into another. Next you install the female and male connectors into the cable connected to the controller. If you’re wiring solar panels in parallel, use MC4 Y connectors. Running all the wiring into the Y connector will do the trick. Next you install the male and female connectors to the charge controller cable.
8 AWG copper wire conductor is ideal as it cuts down power loss. The larger the wire the lesser the power loss. However large wires can be difficult to crimp and work with.
Step 2: Run the Cable Wire into the RV
The solar panel cable needs to get into the RV and connect to the solar charge controller. You have 3 options:
Through the Plumbing Pipe: you can run the cable wire next to or through the plumbing pipe. You’ll likely have to create holes so put sealant there. You should only try this option if you cannot get the panel cable through the refrigerator vent. While this is possible, it takes a bit of work.
Through the Fridge Vent: this is the best method and the easiest. No need to drill holes. Just run the cable through and you’ll have no problem linking it to the charge controller.
Drill a New Hole: do this only if the fridge vent and plumbing pipe aren’t possible. Drill a hole close to a wall or cabinet. This allows you to conceal the wire. Put sealant to prevent leaks.
How to Run the Wire Through the Refrigerator Vent
Before running the cable wire into the fridge vent, make sure the routing path from the roof to the vent is straight. Clean the surface adhesive won’t stick. Clean the areas around the screws and bolts as well. Apply sealant along the base and screw head for extra protection. Now you’re ready to route the wire into the vent.
Remove the fridge vent screws. Let the wire go down the mesh. You can put electrical tape on the wire for extra protection. Put the screws back on when the wire has gone through. You may need to drill holes depending on your fridge’s location. If so, check either side of the area you have to drill to avoid damage. Do not secure the wiring until it is completely routed to the controller. Do not cut any cable wire until all the wires are secure.
When the wire touches the floor use wire loom for protection. Run along the frame rails and place it in the safest place possible. You want to keep the wire as short as possible without compromising its safety.
Step 3: Connect the Cable to the Charge Controller
Place the controller as close to the solar battery as possible to reduce voltage losses. Check your instructions on how to mount the controller. Now connect the panel wires to the controller terminals. Each terminal should have an “input” label or a solar panel image.
Connect the wires to the terminals. The black wire goes into the – terminal, and the red wire goes to the + terminal. Controller wiring procedures vary. Some require you to hook up the controller to the battery before the solar panel. Others say connect to the solar panel first then the battery. Refer to your instructions. Use a multimeter if you’re not sure of the polarity..
Step 4: Install the Inverter
You can use the solar panels now. But if you want to run appliances on solar power you’ll need to install an inverter. Solar power is DC, and the inverter converts this into AC so it’s compatible with consumer electronics and appliances. The inverter size determines how many appliances you can run on solar power, so do your research first.
Follow the installation instructions that came with your inverter. Place the inverter as close to the battery as possible. Follow any safety installation instructions that came with the inverter. Connect the negative and positive wires onto the inverter. Hook it up to your RV’s electrical system.
That’s it you’re done. Now you just let the solar panels charge up. Be sure to test your devices and appliances to see if the system works.
Solar Power Installation Tips
The steps above show how straightforward the installation is. But there are several ways that can make the procedure even simpler.
- Figure out how much power you need.
- Use a cardboard as a solar panel placeholder to determine how much space is available on your RV roof.
- Buy all the necessary equipment.
- Lay out all the tools and materials for convenience.
Buy a Solar Kit. Sure you can buy solar components separately, but it’s much easier to purchase a kit. A solar kit includes most if not all the necessary parts. You don’t have to worry if the solar panel is compatible with the inverter, the charge controller etc. Here are our top picks.
Buy From a Quality Manufacturer. If the solar kit doesn’t include a required component, you can buy from the same manufacturer or another one, as long as they’re reputable. Solar panels with the same specs may not run the same way due to differences in design. Quality manufacturers ensure their products are compatible, making installation easier.
A few more things you should note down:
- Maximize sun exposure: Install the solar panels so it gets the best exposure to sunlight and without roof obstruction. Don’t install the panels close to the RV antenna or AC system.
- Proper controller position: the charge controller should be placed close to the battery but not right next to it. Just keep the distance short and it will optimize charging.
- Solar kit fuse guidelines: use the fuses that come with your solar kit. Place the fuse near the controller. Position the other fuss as indicated in the instructions. Once all the connections are set, you can begin installing the fuses.
How Much Does RV Solar Installation Cost?
An RV solar installation is is different from home solar power systems. Residential solar systems are designed to run the entire house, but an RV solar power system often provides power for the batteries to run just a few appliances. Refrigerators, air conditioners, washing machines etc. are almost impossible to run on portable solar panels. They require so much power RVers use propane or other means to run them.
RV installation costs will depend on how much power you need. The simplest solar kit costs around $300 while complete solar power systems are in the $2,000+ range.
This is the cost of the equipment, not the installation itself. If you’re going to install the system then it’s zero cost to you. You could hire a professional to install the solar kit on your RV, but it’s going to cost a few hundred dollars.
If you’re handy with solar components and into DIY, installing a solar system on a motorhome shouldn’t be an issue. Even with little experience you can probably do it by following the instructions. But if you’re not comfortable handling cables and wires, there’s no shortage of solar power installers available.
Solar Power RV Installation FAQ
If your solar power isn’t working the way you expect, check the product instructions for a troubleshooting guide. You can also refer to the following information.
How Do I Check the Positive / Negative Connections on My Solar System?
Use a volt meter. If the connections are correct the display will state 12 volts. If the positive / negative connections are incorrect, the reading will be negative.
Why is My Solar Panel Not Charging?
No Sunlight: look at the panel, as sunlight should be reflecting off it. Solar panels under direct sunlight is most ideal. In optimum conditions, a 100W panel produces 5 amps. Check the solar panel display that came with your kit.
Shadows: look for shadows on the panel. A building or tree could be blocking the panel. Even a slight shadow can drastically affect the panel’s production.
Overcast weather: What’s the weather like in your area? Summer produces the most energy while spring and fall produces less electricity. Wintertime it’s even lower. During winter, fall and spring, adjust the solar panels’ position (or your RV’s) so they receive as much sunlight as possible.
Why is My Battery Not Charging?
Faulty wiring: check the connectors / cables for any loose fittings. Secure tightly.
Age: a battery’s performance deteriorates with age. If it’s new there should be no issues with charge. If your RV solar battery is a couple of years old or older, expect a slight change in performance, even deterioration. The older the battery, the faster charges go down.
The Solar Panel / Inverter / Controller / Battery Stopped Working. Why?
Blown fuse: inspect the fuse between the solar panel and the controller. If it’s blown or otherwise defective, replace immediately. The fuse may also be located between the controller and battery. Look for signs of damage and replace it as well. Safety tip: turn off your solar power system before replacing any fuse. Cover the panel with a towel before opening the fuse box.
Solar panel wiring damage: examine the wire that goes through the deck fitting or roof. Replace wiring with signs of splits, cracks or chaff. Do the same for the solar panel connectors. Safety tip: turn off the solar power system, take off the fuse boxes and cover the panels with cloth before fixing the wires. You may also want to examine the rest of your RV’s electrical wiring for damage.
Why is My Solar Panel Producing Zero Output?
Damaged charge controller: the most likely reason is a defective charge controller Turn the system off and check the unit. Disconnect the controller and connect it again. If it doesn’t work, it might be a blown fuse. If that doesn’t work, you have to replace the controller.
Faulty inverter: turn off the system and check the inverter. Disconnect the inverter. Wait a few minutes and reconnect. If that doesn’t work, disconnect the inverter and examine the wiring for damage. If there’s wiring damage, the inverter is defective.
Defective solar panel: one of the solar panels in your array may be damaged. If you wired them in a series a single panel’s failure can bring down the whole array. Inspect each panel thoroughly for signs of damage. You should also examine the connectors and wiring.
Why is My Solar Panel Not Producing Enough Power?
If your solar panel is not producing the power the manufacturer’s rating promised, there are several possible causes:
Panel shading: as described earlier, tree shading can reduce solar panel production. If you parked your RV near trees there’s a good chance the panels will get blocked.
Overheating panels: solar panels need the sun’s energy, but too much heat leads to voltage level drops. Solar panels are designed for use in specific temperature ranges. The higher temperature, the lower the voltage and electricity production. One solution is to simply wait for the temperature to go down. A more permanent solution is to add more panels to the array. This will boost the string voltage and enable the array to withstand the heat.
Poor air circulation: there needs to be some air circulation under the panels. This clearance must not be blocked.
Frayed / faulty connections: wiring problems is a common cause of poor solar power performance. If not replaced it could also lead to solar panel overheating. Examine the connections if you notice a drop in performance. Use a multimeter to analyze the voltage across the system.
Is Installation Easier on a Solar Ready RV?
First, what does solar ready RV mean? It tells you the RV wiring has been pre-configured to accommodate solar power. A solar ready RV has the connections, wiring and ports required for solar installation. You just plug the connectors in the ports and you’ll be ready. These RVs do not come with solar components, but they do make installation easier.
Solar ready RVs are configured in one of three ways:
- Solar Roof Port
- Solar Sidewall Port
- Coil Wire
Solar Sidewall Ports
Solar sidewall ports are the most popular. They are inexpensive and make it easy to connect portable solar power systems to your RV. These ports are suitable if you camp during the weekends or do RV camping a few weeks a year.
Sidewall ports cannot handle large solar systems, so it’s not sufficient if you spend lots of time in your RV or camp for long periods. Sidewall ports are often used for 200W to 300W solar panels or smaller. Large solar systems require a roof port.
Solar Roof Port
Solar roof ports are made for 400W, 500W and larger solar systems. These are meant for heavy solar power users and off grid living / boondocking. An RV with solar ready wiring and roof port is ready for installation. You just need a solar panel and charge controller.
Calculate how much solar power you need. If it’s greater than 200W, you’re better off buying a solar ready RV with a solar roof port. It’s worth the investment as the configuration makes installation easier.
Coil Wire
Avoid this if you can get a sidewall or roof port. Coil wire consists of a wire that has been set by the battery and up the roof. There is no battery connection, wiring or port. If the RV label says “solar cable behind wall” or provides directions to drill a hole in the roof, that’s a coil wire configuration. You might as well do a complete DIY installation.
Conclusion
Portable solar panel installation for RV appears daunting especially if you don’t consider yourself a DIY enthusiast. And it’s perfectly all right to hire a pro to do the installation for you. But as we have shown here, the step by step process really isn’t complicated. And there’s nothing quite like watching that solar panel you set up working before your eyes.

I am an advocate of solar power. Through portablesolarexpert.com I want to share with all of you what I have learned and cotinue to learn about renewable energy.